MicroJPM
8878D 2 in 1 Rework Station - (AD56631)
8878D 2 in 1 Rework Station - (AD56631)
Couldn't load pickup availability
Description:
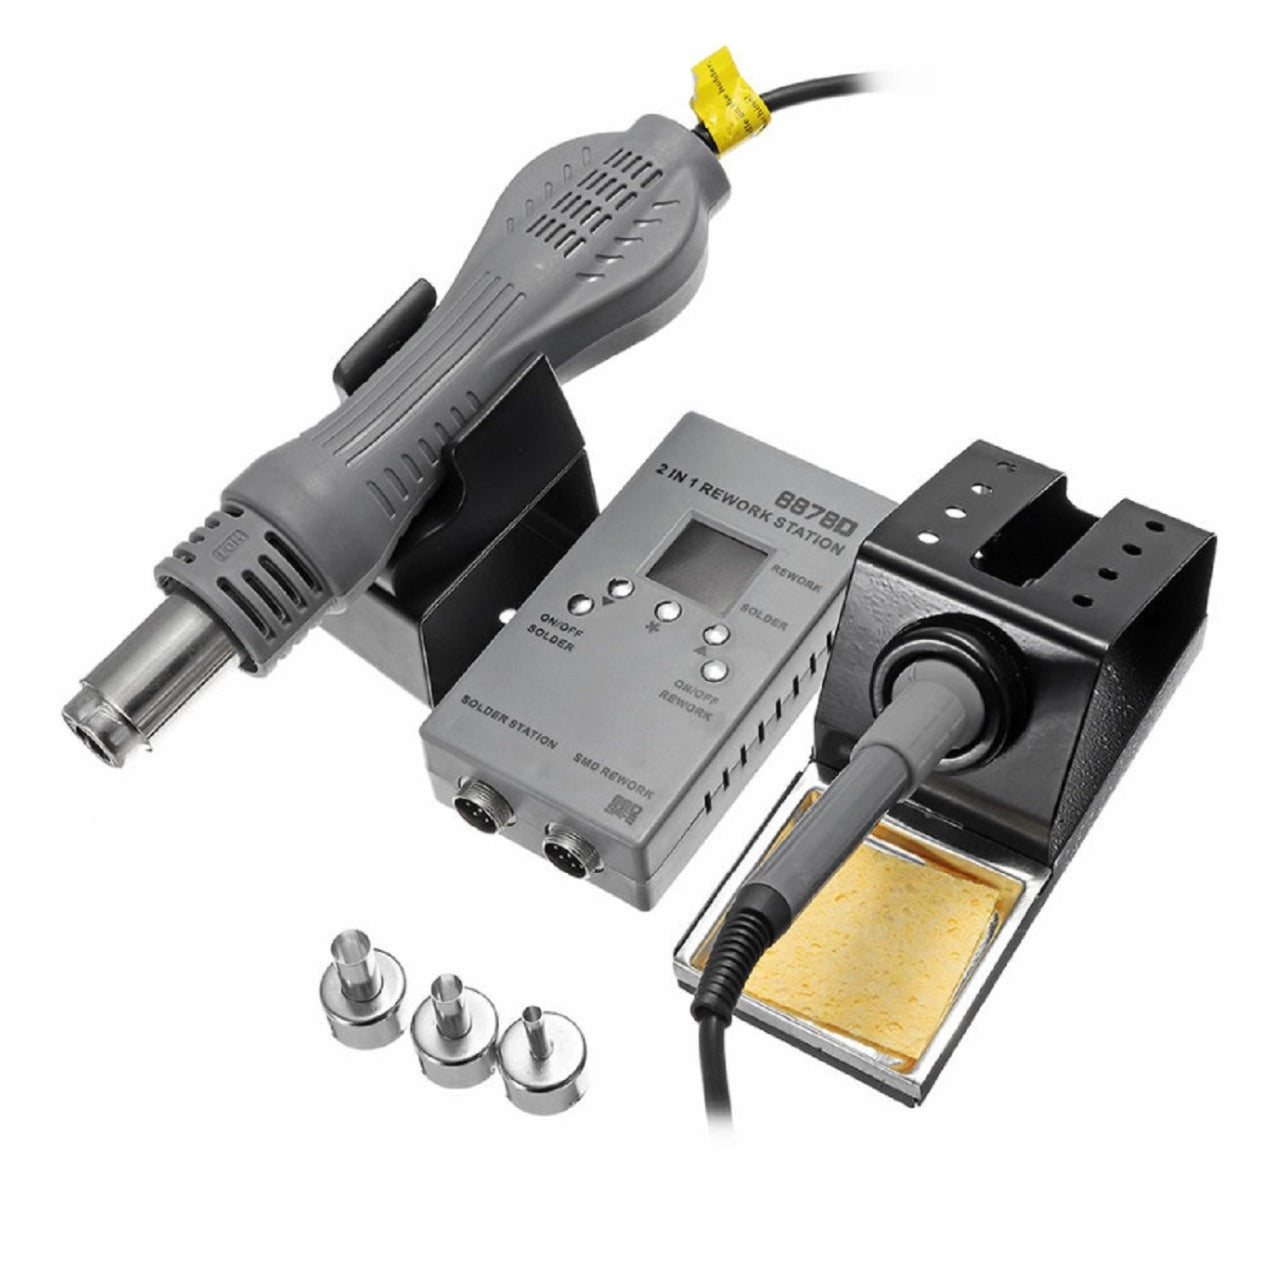
This is a 2-in-1 soldering station, featuring a hot air gun and a soldering iron. Its excellent space-saving design and extremely low noise levels make it easy to operate. It features a digital LED display to show the precise temperature, controlled by a SAMSUNG microcomputer. It heats up quickly and uses PID technology to improve temperature stability. It also easily adjusts airflow and temperature control rotation.
It features an intelligent auto-sensing function for safe personal operation, automatically stopping rotation (airflow) when the temperature drops below 100°C. The heat gun's handle has a presence-sensing switch, which activates operating mode when lifted or standby mode when placed on its base.
This station also has an automatic cooling function to effectively extend the heater's life and protect the hot air gun. It features an ESD-rated soldering iron design to protect sensitive components. The heater meets international standards for convenient use and replacement (the heater can be purchased separately in case of damage); the heating element is high-quality for long-lasting use; it has a plastic stand for placing the hot air gun; and a metal stand to keep the soldering iron away from flammable materials. This tool is suitable for SOIC, CHIP, QFP, PLCC, BGA, and temperature-sensitive component packaging. It is suitable for shrink heating, drying, lacquer removal, desticking, preheating, and glue soldering. It is CE (European Conformity) approved.
Specs:
- Voltage: 110VAC
- Power consumption: 700W
- Air flow: 120L/MIN
- Gun temperature range: 100-480 ℃
- Soldering iron temperature range: 200-480 ℃
- Includes 3 nozzles (φ5 mm, φ8 mm, φ10 mm) for versatile applications
Package Included:
- 1x Rework Station 2 in 1
- 1x Hot air gun
- 1x Soldering iron
- 1x Soldering iron stand
- 1x Heat Gun Holder
- 3x Heat gun nozzles
- 1x Sponge pad
- 1x Manual
Instructions:
1. When the power is connected, the buzzer will sound, indicating that the power is initialized.
2. Turn on the air gun, or short press the air gun switch, the air gun is on.
3. Turn on the soldering iron, short press the soldering iron switch, the soldering iron is on.
4. Adjust the air gun temperature, or press the "*" button until the number on the air gun display screen flashes for the first time. Press the "▲" or "▼" button to set the required temperature for the air gun.
5. Adjust the air level of the air gun, or press the "*" button until the number on the air gun display screen flashes for the second time. When the air gun display screen shows "F" and the air volume number, press the "▲" or "▼" button to set the air volume required for the air gun.
6. Set the air gun to manual/auto function, or press the "*" button until the number on the air gun display screen flashes for the third time. When the screen displays "A (auto)" or "H (manual)", press the "▲" or "▼" button to select the air gun manual/auto function; when in automatic mode, the air gun will automatically cool on the stand, and it will stop working when the temperature is lower than 100℃. when in manual mode, the air gun will not cool on the stand and will continue to work normally.
7. Set the air gun compensation temperature, press and hold the "*" button, then the air gun display screen and the soldering iron display screen will show the respective compensation temperature numbers, then short press the "*" button until the air gun The numbers on the display screen flash, press the "▲" or "▼" button to set the compensation temperature needed for the air gun.
8. Turn off the air gun, press and hold the air gun switch, the air gun turns off.
9. Set the soldering iron temperature, or press the "*" button until the number on the soldering iron display flashes for the first time. Press the "▲" or "▼" button to set the required soldering iron temperature.
10. Set the soldering iron sleep time, or press the "*" button until the number on the soldering iron display flashes for the second time. When the soldering iron display screen shows "S" and the sleep time, press the "▲" or "▼" button to set the required sleep time for the soldering iron. The soldering iron sleep time can be set between 0 and 99 minutes. Please note that when the sleep time is "00", the soldering iron will continue to work and will not sleep.
11. Set the soldering iron's compensation temperature by pressing and holding the "*" button until the air gun and the soldering iron's display screen show the respective compensation temperature numbers, then briefly press the "*" button until the soldering iron's display number flashes. Press the "▲" or "▼" button to set the required compensation temperature for the soldering iron.
12. Turn off the soldering iron, press and hold the soldering iron switch, the soldering iron turns off.
Compartir